Description of the Webpage-Monitor application
Authors: Stefan Preuer, Manuel WallnöferContents of this Description
1. Projectinformation2. Projectoverview
2.1 Kinds of monitoring
2.2 Usability aspects
3. Userguide
3.1 Login
3.2 Logout
3.3 Category management
3.4 Create channels
3.5 Monitor channels
4. Administratorguide
5. Installationguide
5.1 Step by step guide
5.2 Manual configuration:
5.3 Building from the sources:
6. Download
6.1 Binary version
6.2 Source version
6.3 Installer
1. Projectinformation
The Webpage-Monitor application is the result of a PWG-Projektpraktikum at the SSW institute. It has been developed by Stefan Preuer and Manuel Wallnöfer, both are students of information science at the JKU Linz. The person of charge made available by the SSW institute was DI Thomas Kotzmann.The Project timetable:
| Project release date: | 11. October 2004 | |
| Date of final project presentation: | 17. July 2005 | |
| Date of overall project completion: | 02. September 2005 |
2. Projectoverview
The goal of the project was to develop a web-based tool, which enables the user to monitor webpages in an easy way. The capabilities provided by the monitoring feature were supposed to enable the user, on the one hand to monitore the change of a webpage up to a certain depth, and on the other hand to limit the monitoring to user defined parts of a webpage and to form user defined messages out of the selected parts. In the former case the depth of monitoring is meant as the number of hyperreferences followed relative to the base webpage of the particular observation.The techonology to use for implementation was predetermined by the institute. So we were supposed to use the Microsoft .NET technologie and espacially the ASP.NET technologie for implementing the user interface. This was done in conformance with the topic of the PWG, the Projektpraktikum was part of. This topic was called "Softwareentwicklung unter .NET".
Kinds of monitoring:
As mentioned earlier there are two ways of monitoring provided by the Webpage-Monitor application. In the following part we want to explain the intention of these two kinds in a more detailed fashion.Monitor changes of a webpage up to a certain depth:
This kind of monitoring allows the user to observe the changes to a hierarchy of webpage linked together by hyperreferences. The user has to define the URL of a base webpage and a depth. When the user initiates the monitoring of the corresponding channel, the base webpage and all webpages referenced from this side up to the specified depth are processed. The processing of a single page includes determining the title of page, determining all hyperreferences on the page and calculation of a hash value out of the page. The determined hyperreferences of a page represent pages to process in the next step up to the specified depth of the channel. Based on the information about the hash value of a webpage and the hyperreferences on this webpage, a comparison of this values to the values of the preceding observation, stored in a database, allows the application to determine the kind of change to each individual webpage in the context of the whole observation. Beside error states possible kinds of change are unchanged, changed, new and invalid mime-type for references to resources not representing a html- or xhtml-webpage. It is important to mention, that the application recognizes a multible occurence of a link to an identical resource and handles this without retrieving such a resource twice and without redundant information getting stored in the database.
The Webpage-Monitor application provides a view to such a monitoring up to a certain depth. This view is represented to the user as a tree, where each node is an observed webpage, and holds information about the title, the url and the state of change to this individual page corresponding to the context of the whole observation. The child nodes of an individual node are those corresponding to the resources hyper-referenced from the father-node. Therefore, although the stored representation of an observation doesn't store redundant information in case of a multiple occurence of a link to a certain resource, the view represents it in the right way corresponding to the parent-children relationship based on the hyperreferences in the parent-webpage. If an individual webpage directly references a resource multiple times, than only a single parent-child relationship results out of this, both in the view and in the stored representation.
Monitor a user defined message out of selected parts of a webpage:
This kind of monitoring allows the user to select parts of a webpage and define user defined messages, which can get parameterized by these parts. This user defined selection of parts of a webpage under observation is realized in two consecutive steps, where the second step optionally complements the first one. Therefore the second step is an optional one.
Now the first step of selection is based on the DOM-view of a Html- or XHtml-webpage. Such a DOM-view is a hierarchical representation of the elements a webpage contains. Therefore the granularity of this selection is limited by Html-elements. Multiple such selections within a single webpage are possible, and the order of the selection is significant, as the consecution of the individual parts represent the base for the second step of selection. By default this first step of selection selects the whole body of the webpage. The syntax used by the Webpage-Monitor application to descripe such a DOM-based selection isn't a standardized one, and therefore was individually developed for this application. As we will describe in a later section, the user normally isn't confronted with this syntax, because this selection normally can be done in a graphical way.
The second step of selection is based on regular expressions. As mentioned earlier, this second step of selection is optional. It makes it possible to narrow the selection with a regular expression, where the thereby selected parts are extractable by the concept of capturing groups. Capturing groups are parts of a regular expression denoted by bracketing. The corresponding parts in the match of the regular expression can get referenced by a specified name or based on the serially numbering of the capturing groups which occure in the regular expression. A good introduction and overview about regular expressions in the Perl style, as used by the Webpage-Monitor application, can be found at http://www.regular-expressions.info. Now these matches for the capturing groups can be used to parameterize a message template, which is defined by the user. The result is a user defined message out of selected parts of a webpage, which gets monitored.
A typical example for the use of such a kind of monitoring is the observation of the gasoline price publicated at some webpage. Therefore a corresponding selection for the price must be provided by the user, than he can form an individual message out of it. The big advantage is the integration of information, the user is interested in observing it, into one single web-application.
Usability aspects:
One important goal of the project has been to provide a smart user interface based on web techonlogies, so that no additional client-software need to be installed. In the following section we want to describe important aspects of the Webpage-Monitor application where this goal becomes evident.Graphical selection:
This aspect belongs to the definition of a channel for monitoring a user defined message out of selected parts of a webpage. Since it is very difficult in terms of usability, to require the user to define the intended selection as textual representation, we wanted to provide a more comfortable user interface. The idea was, to enable this selection in a graphically supported way via a pointing device. Because we have used a web based user interface, the techonology we have choosen to enable such client side selection are client side Java Scripts executed in the script interpreter of the webbrowser. Therefore, during the run of the corresponding wizard the user is supposed to define the url of the webpage the channel should belong to. After this the Webpage-Monitor application retrieves this webpage, and enhances it with a Java Script that is reponsible for the graphical selection at the client. Now the user is enabled to do a comfortable selection of the webpage-part he is interested in. At the end of the selection the injected Java Script submits a textual representation of the selection to the Webpage-Monitor application running at the server. Since the injected Java Script is based on the DOM-model this graphically supported selection is limited to the mandatory first step of the user defined selection of webpage-parts the user is interested to monitor. As descriped earlier, the user can refine the selection based on a regular expression, which gets used in the optional second step of selection.
Categorization of channels:
One other important aspect in terms of usability is the categorization of channels. Therefore, the Webpage-Monitor application provides an easy to handle hierarchical categorization, which is fully manageable by the user. So the user is able to categorize his channels of interest in a way appropriate to himself. The visual representation provided by the web interface is compareable with that of a typical filesystem browser, with which almost every user is familar with. There is also no restriction about mixing different kinds of channels in the hierarchy of categorization.
Presentation of the results:
For the user it is very important to get a good presentation of the results. This is especially important for kinds of cannels responsible for observing the change of a webpage up to a certain depth, because in case of a high depth a lot of information must get presented. We have decided to present a tree view to the user, where each individual node can get expanded to show its direct childs or all descendants. So the user can easily browse through the hierarchy of observed webpages. It is also possible for the user do enable or disable special filters which belong to states of observed webpages, which enables the user to show only webpages which fullfill these states, e.g. it allows the user only to show webpages which changed since the last observation. The user can also easily show an observed webpage in a new browser-window, since every node in the hierarchy of observed webpages provides such a link.
3. Userguide
In this section we wan't to guide you through the Webpage-Monitor application from a users point of view. Therefore we show you how to interact with the application.3.1 Login
To use the Webpage-Monitor application you need access credentials in form of a username and password, since a mandatory login is required. The application distinguishes two different types of users - normal users and administrators. Administrators are able to manage the accounts for the normal users of the Webpage-Monitor application. So if you need access to the Webpage-Monitor application the administrator for the application is responsible to set up an account for you. Each normal user gets his individual area to manage his own channels of interest. Figure 1 shows the login dialog of the Webpage-Monitor application.
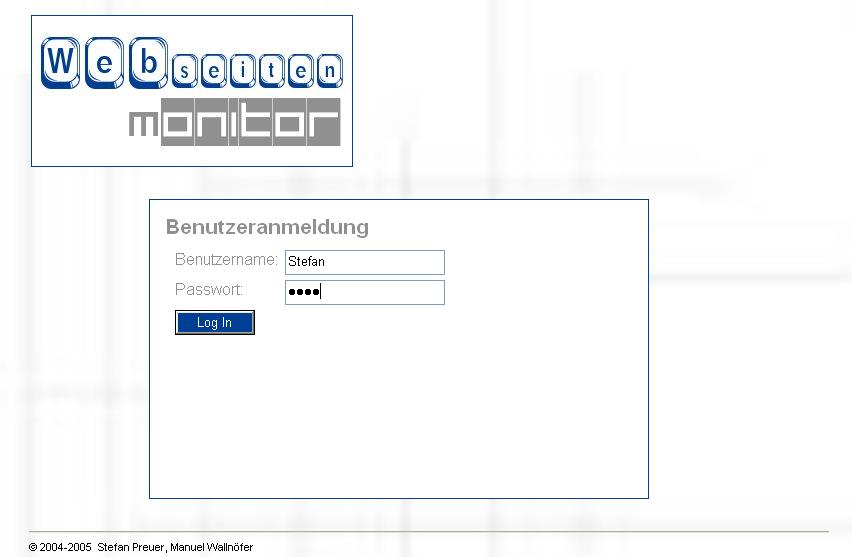
Figure 1: Login dialog
3.2 Logout
After you have used the Webpage-application you should logout. If you are logged in and don't use the application for a period longer than 20 minutes your login expires, and you have to authenticate again by using the login page. The logout gets initiated by clicking on the button named "Log out". Figure 2 shows the corresponding part of the user interface.
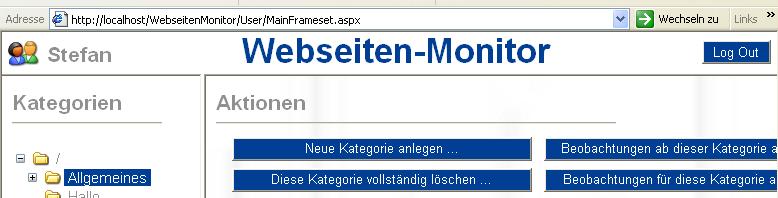
Figure 2: Logout
3.3 Category management
On the left side of the user interface there is the hierarchical presentation of the individual categories for the user. Except of the root folder, which can't get deleted, the whole hierarchy is manageable by the user. If the user selects a category an overview of the channels in that category and possible actions are presented in the right frame of the user inteface. Among these actions are buttons for managing the category hierarchy. After clicking the button named "Neue Kategorie anlegen ..." you get asked for the name of the new subcategory, which will get created. And with the button named "Diese Kategorie vollst�ndig l�schen" you can delete the current category and all its descendants. The channels in all this categories get deleted too. To change the name of a category you have to click the button named "Diese Kategorie umbenennen ...", so have the ability enter a new category name. Figure 3 shows a category hierarchy.
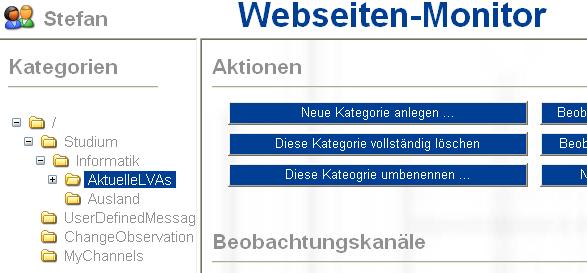
Figure 3: Category management
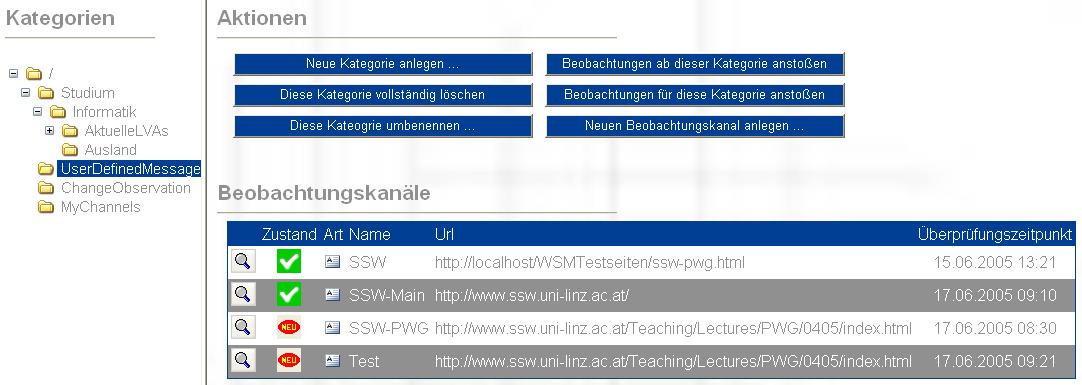
Figure 4: Channels within a cagetory
3.4 Create channels
As described earlier in each category except thr root category you can create channels of observation. Therefore you have to select the category in which you want to create a new channel. After that you have to click on the button named "Neuen Beobachtungskanal anlegen ...", which gets presented in the right frame of the userinterface, and a wizard will guide you through the creation of the channel. The wizard is designed to give you contextoriented help to each information you have to enter, therefore it is very easy to create a new channel.
Nevertheless we want to explain one important aspect of creating a new channel, namely the graphical selection in case of a channel to monitor a user defined message out of selected parts of a webpage. During the wizard you have the choise to use the graphical selection or to enter the selection in a textual way. In the chase you choose to use the graphical selection the webpage of interest enhanced with a special script for selection gets loaded into the webbrowser. Selectable elements of the webpage get inverted by there color appearance if you move over them with the pointing device. Now you have to click a button of the mouse to mark such an element for selection. You can mark several elements, but keep in mind that the order of selection is important since the resulting selection is the consecution of the individual marked elements in the order the get marked. You can also cancel the mark of elements if you click on them again. After you have marked all elements of interest you can initiate the submission by pressing the return key of your keyboard. Figure 5 shows such an selection on an example webpage.
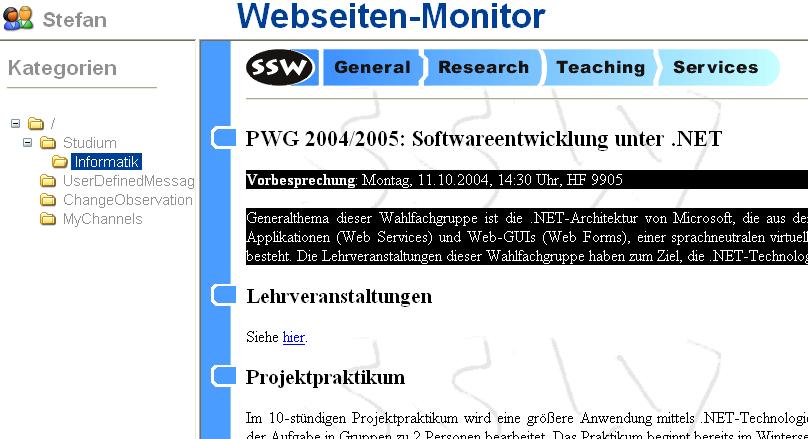
Figure 5: Example graphical selection
3.5 Monitor channels
After you have created a new channel you can monitor the contents observed by it. If you select a category get presented an overview of all channels in the category. This overview includes an indication of the channels state. The following states are possible, the get indicated by a corresponding symbol.
 An error occured during the last monitoring by this channel.
 No monitoring has been done with this channel in its current
configuration up to now.
No monitoring has been done with this channel in its current
configuration up to now. The first monitoring was done with this channel in its current
configuration.
The first monitoring was done with this channel in its current
configuration. The content observed by this channel did not change
in comparison to the monitoring before the acutal one.
The content observed by this channel did not change
in comparison to the monitoring before the acutal one. The content observed by this channel changed in
comparison to the monitoring before the actual one.
The content observed by this channel changed in
comparison to the monitoring before the actual one.In this overview you also get information about the kinds of the channels in the category:
 Monitor changes of a webpage up to a certain depth
 Monitor a user defined message out of selected parts of a
webpage
Monitor a user defined message out of selected parts of a
webpageTo get detail information about the observation results of a channel you have to click at the symbol depicting a magnifying glass.
In case of a channel for monitoring a user defined message out of selected parts of a webpage an example channel might look like that shown in Figure 6.
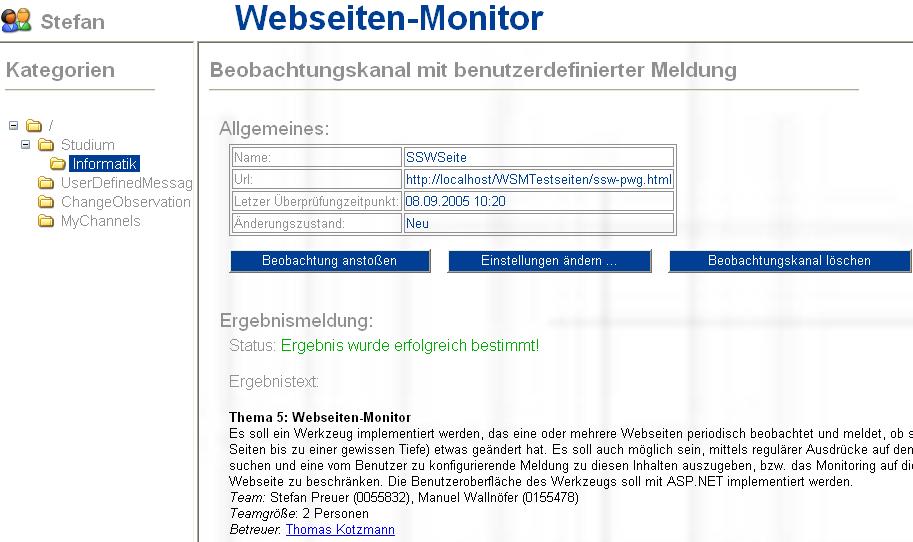
Figure 6: Detail view of a channel for monitoring
a user defined message
The second kind of channels are that for monitoring changes of a webpage up to a certain depth. In the detail view of such channel you get presented the tree view of the observed webpages during monitoring. The tree view results from the parent child relationship of a webpage and the webpages referenced in it through a hyperlink. An example of such a channel is shown in Figure 7:
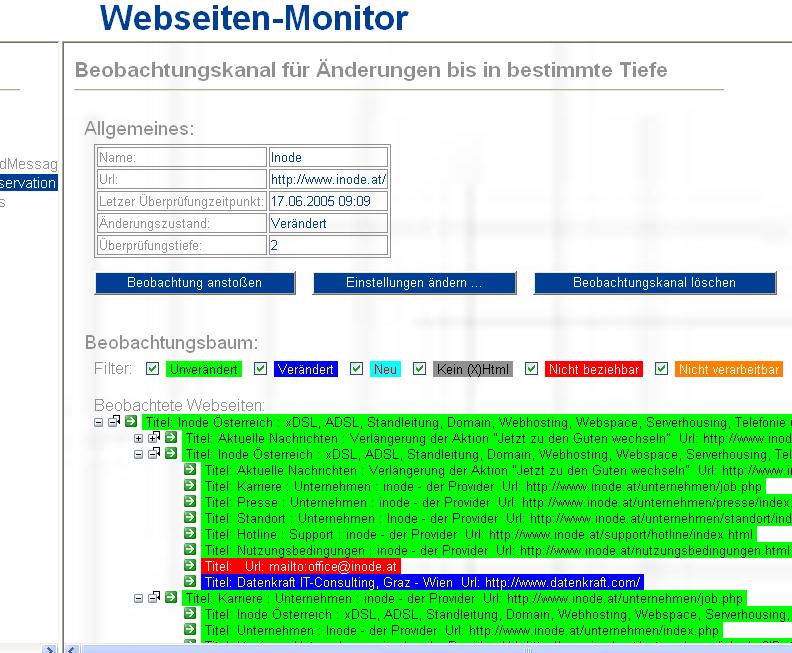
Figure 7: Detail view of a channel for monitoring
a webpage up to a certain depth.
4. Administratorguide
After installing the Webpage-Monitor application the primary job of the administrator is the user management. So if an administrator logs in he gets presented the user interface for managing accounts for the application. Figure 8 shows that part of the user interface.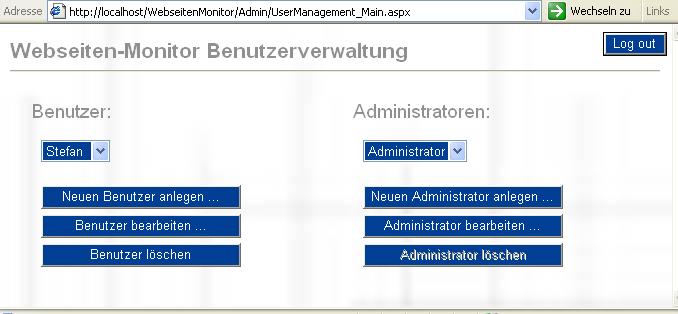
Figure 8: User management for administrators
5. Installationguide
In this section we provide a guide for installing the Webpage-Monitor application. This guide is based on the binary distribution of the Webpage-Monitor application, which is downloadable at this webpage and targeted for the Windows 2000/XP operating system.The binary distribution comprises a GUI-based installation program, which lets you set up the application in a comfortable way.
Requirements:
- Microsoft .Net Framework:
- Microsoft Internet Information Services (IIS):
- Microsoft Sql Server:
The application is targeted to run with the Microsoft .Net Framework. It has been developed and tested with the version 1.1 of the framework.
Since the user interface of the application is based on ASP.Net a web server able to host ASP.Net applications is required. Therefore the first choice are the Microsoft Internet Information Services (IIS), which are recommended by Microsoft to use for hosting ASP.Net webapplications. We have developed and tested the application with the version 5.1 of IIS.
The Webpage-Monitor application needs to persist data, therefore a relational database management system has been used. We have developed and tested the application with the MSDE2000A (Microsoft SQL Server 2000 Desktop Engine, Version A). Since it is a free desktop license of the Microsoft SQL Server 2000, the Webpage-Monitor application is also supposed to work with the Microsoft SQL Server 2000.
5.1 Step by step installation guide:
- Download Webpage-Monitor application:
- Run the self-extraction installation file:
- Configure the application in the setup dialog:
- Set up IIS-Webserver for hosting the Webpage-Monitor application:
- Configure Login.aspx as default document with highest priority.
- Make sure that the Fileextensions ".aspx, .asax, .config, .cs, .csproj, .resx" are registered with the aspnet_isapi.dll provided by the .NET Framework (e.g. C:\WINDOWS\Microsoft.NET\Frameword\v1.1.4322\aspnet_isapi.dll). The registrations should comprise GET and POST requests. For proper function you only need to register .aspx files, but to allow ASP.NET to control access to the source and configuration files of your application the other extensions should also get registered to ASP.NET.
-
In IIS you can configure directory based access control. First of all you have to configure "Anonymous access",
since the application uses Forms-authentication, i.e. ASP.NET is responsible for authentication and authorization.
The accout to map anonymous user to must be one who has filesystem read access to the application directories (by
default IUSR_machinename).
Generally, in IIS you can configure for each directory to allow read, write or search in this directory. Therefore prohibit write and search rights to all directories of the application! Allow read rights to all directories of the application except of the directory named "bin". - Check the proper configruation of http-handlers in the .NET configuration. Normally the .NET distribution provides a proper configuration in the default machine.config of the .NET framework. For security reasons it is necessary that, the http-handler for the extensions ".asax, .config, .cs, .csproj, .resx" are set to System.Web.HttpForbiddenHandler. The one for .aspx files must be set to System.Web.UI.PageHandlerFactory. This configuration is done in the httpHandler subsection of the system.web section. For more information see the .NET framework documentation.
First you have to download the Webpage-Monitor application from here. Note, that this guide is based on the binary version.
Run the .exe file (WebseitenMonitorSetup.exe) downloaded in step 1.
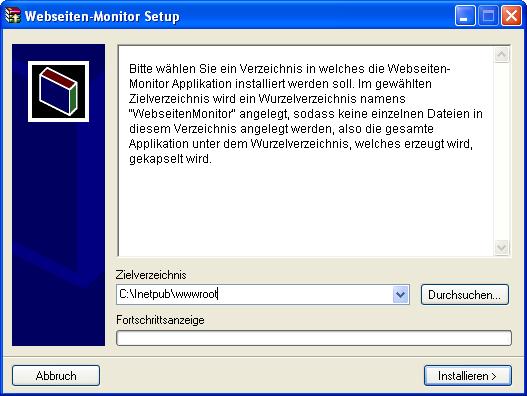
Figure 9: Setup extraction dialog
Note, that you have to set this directory as web-application base directory in IIS in a later step.
In the second step you have to parameterize the application and set up the database, this can be done by the Webpage-Monitor Installer application, which gets automatically started after the extraction of the Webpage-Monitor application.
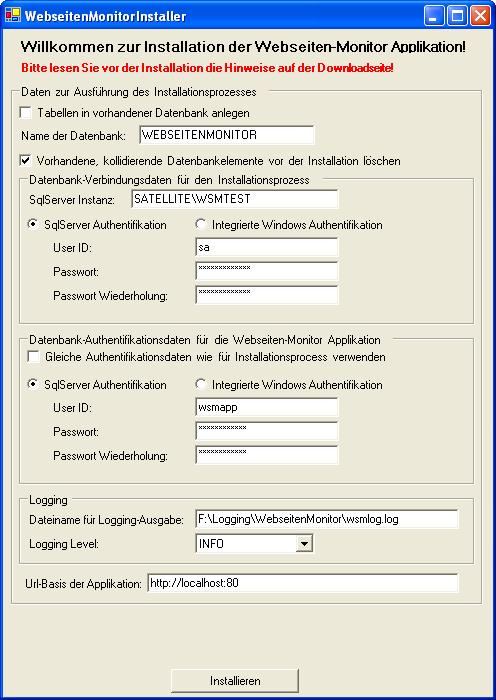
Figure 10: Setup configuration dialog
Webpage-Monitor Installer dialog:
First of all you can choose if you want the installer to create a new database for the application, or if it should use an already extant one. In both cases you have to enter the name of the database, either to use as extant or to create by the installer. It's important to note, that by selection of the option named "Vorhandene, kollidierende Datenbankelemente vor der Installation l�schen" all extant database elements the installer will create through the installation process are deleted in a preceeding step. So, if you don't select the option named "Tabelle in vorhandener Datenbank anlegen" the whole specified database gets droped in an initial step, provided that it exists.
In the textfield named "SqlServer Instanz" you have to provide the DBMS instance to use. It's important to note that with MS SQL Server 2000 it is possible to have more than one DBMS instance running on one machine, therefore the concept of named instances was introduced by Microsoft. An instance is uniquely identified by the server the instance is running on and the name of the instance (Note: in case of the default unnamed instance the name of the server provides enough information to identify the instance of interest). So if the instance is running on a server named "SATELLITE" and the target instance is named "WSMTEST", this instance is denoted by "SATELLITE\WSMTEST". Instead of the servers name you can also provide its network address.
To be able to connect to the specified DBMS instance you have to provide the kind of authentication an the credentials to use in case of SqlServer-authentication. It is possible to provide two different configurations for on the one hand the installation process and on the other hand the Webpage-Monitor application. This differentiation is done because the installation process needs higher privileges at the DBMS, because it has to create the database objects needed. If you don't want to consider this differentiation you can choose the option named "Gleiche Authentifikationsdaten wie f�r Installationsprozess verwenden".
With the credentials provided for the installation process it must be possible to create new database-tables in the specified database, and if the application should also create the database it must also be authorized to do this. If you select to use the same credentials for the Webpage-Monitor application as used by the installation process, the installation process doesn't expicitly affect any table ownership or grants to the tables. But if you choose to use individual credentials and SqlServer authentication for the application, a login with the credentials entered gets added to the DBMS and on all tables created by the installation process the ownership gets changed to the database user associated with the created login credentials. This database user gets created with the same name as the login name provided - note, that SQL server distinguishes login id and user name, but by default the are equal.
In the section named "Logging" you can specify a filename for the logging-output and a level of severity which represents the lower bound of levels to log.
An important configuration is the textfield named "Url-Basis der Applikation", it is important to make the graphical selection, in case of a channel to monitor a user defined message out of selected parts, work. In this field you have to specify the part of the Url of the Webpage-Monitor application pages before the local path of the application. So for example, if the login page has the url "http://localhost:80/WebseitenMonitor/Login.aspx", you have to specify "http://localhost:80".
After you have entered all information you have to initiate the installation by clicking at the button named "Installieren".
Now you have to configure a virtual directory in IIS, which serves the physical directory where you extracted the application in the first step of the installation. After you have set up such an virtual directory there are some configurations you have to do for proper work and security of the Webpage-Monitor application.
The configuration done by the Webpage-Monitor Installer application comprises setting up the database and configuring the application through its web.config file. So there is nothing magic in it, and you can do it manually by yourself if you have problems with the installer, or if you want to change the configuration later on.
The database tables are created by the following transact-SQL statements:
			CREATE TABLE Users

				(

					Id int IDENTITY(1,1) PRIMARY KEY,

					LoginName nvarchar(15) NOT NULL,

					PwdHash nvarchar(50) NULL,

					Role nvarchar(15) NULL DEFAULT (N'users'),

					CheckCounter int NOT NULL DEFAULT (0)

				)


		GO


			CREATE TABLE Categories

				(

					Id int IDENTITY(1,1) PRIMARY KEY,

					CategoryName nvarchar(30) NOT NULL,

					Fk_ParentCategory int NULL DEFAULT (null) FOREIGN KEY REFERENCES Categories(Id),

					Fk_Users int NOT NULL FOREIGN KEY REFERENCES Users(Id) ON DELETE CASCADE

				)


		GO


			CREATE TABLE Observations

				(

					Id int IDENTITY(1,1) PRIMARY KEY,

					Kind int NOT NULL,

					Name nvarchar(50) NOT NULL,

					Url ntext NOT NULL,

					Date datetime NULL DEFAULT (null),

					CheckCounterTimeStamp int NULL DEFAULT (null),

					ChangeState int NOT NULL,

					Fk_Categories int NOT NULL FOREIGN KEY REFERENCES Categories(Id) ON DELETE CASCADE

				)


		GO


			CREATE TABLE ChangeObservations

				(

					Id int PRIMARY KEY FOREIGN KEY REFERENCES Observations(Id) ON DELETE CASCADE,

					Depth int NOT NULL,

					RootDocument int NULL DEFAULT (null)

				)


		GO


			CREATE TABLE ObservedDocuments

				(

					Id int IDENTITY(1,1) PRIMARY KEY,

					Kind int NOT NULL,

					State int NOT NULL,

					Title ntext NULL,

					Url ntext NOT NULL,

					HashValue varbinary(100) NULL,

					Fk_DelegateFor int NULL FOREIGN KEY REFERENCES ObservedDocuments(Id),

					Fk_ParentDocument int NULL FOREIGN KEY REFERENCES ObservedDocuments(Id),

					Fk_ChangeObservation int NOT NULL FOREIGN KEY REFERENCES ChangeObservations(Id) ON DELETE CASCADE ON UPDATE CASCADE

				)


		GO


			CREATE TABLE UserDefinedMessageObservations

				(

					Id int PRIMARY KEY FOREIGN KEY REFERENCES Observations(Id) ON DELETE CASCADE,

					SearchPatternEnabled bit NOT NULL,

					SearchPattern ntext NULL,

					MessageTemplate ntext NULL,

					SelectedElementsPositionDescriptor ntext NULL,

					ResultState int NOT NULL,

					ResultText ntext NULL

				)
The configuration of the Webpage-Monitor application:
The main configuration file for the Webpage-Monitor application is the file named "web.config" which is located in the base directory of the application. The Webpage-Monitor installer adapts this file.
The application specific configuration is mainly done in the section "appSettings", where key-value pairs are defined, which get used by the application. Whereas the logging is configured in the section named "log4net".
The following application setting key-value pairs are relevant for the user:
- AuthenticationDbConnectionString: The value holds the database connection string used for authenticating a user against the Users database table.
- DbTableOwnerPrefix: This value holds the prefix for qualifying the database tables, in case of the user associated with the database connection is not the owner of the tables or not in the dbo role. For example if the user associated with the database connection is named "testuser" and this user isn't owner of the Webpage-Monitor databasetables use "testuser." as DbTableOwnerPrefix, so the user only needs select, update and delete grants to the tables.
- DbConnectionString This value holds the database connection string used by the Webpage-Monitor application to connect to the database, except in case of connection due to authentication reasons (see: AuthenticationDbConnectionString).
- myAppUriAbsolutePathPrefix This value holds the value named "Url-Basis der Applikation" in the installer user interface. It is important not to enter an closing slash for this prefix (note: the installer user interface would eliminate such one). For more information see the explaination given in the step by step installation guide corresponding to this configuration option.
You can also download the Webpage-Monitor application in a source distribution. This allows you to take a look at the source code. Since the source distribution includes a NAnt build script its easy for you to build the application out of its sources. For more information about NAnt see http://nant.sourceforge.net/.
The buildfile recognizes a property named "build.nunit.testcases", which is set false by default. If you pass this property with a value of true (e.g.: nant -D:build.nunit.testcases=true) the Nunit-test in the sources get build too. In this case you have to ensure, that the assembly named "nunit.framework.dll" is in the library path of your environment, the best solution is to install NUnit into the global assembly cache.
Maybe you also have to adopt the library path for the assembly named "Microsoft.mshtml.dll". Therefore its the best solution to adopt the include pathes of the references in the "lib" section of the csc-task in the build target of the Nant build-file named "WebseitenMonitor.NAnt.build". All other references should not make any problem, since the are included in the distribution or the are .NET core assemblies installed in the GAC by default.
6. Download
6.1 Binary version
WebseitenMonitor_Setup.exe
This binary version represents an executable Win32 file, that helps you to install the Webpage-Monitor application on your computer. It includes the Webpage-Monitor Installer application that allows you to configure the Webpage-Monitor application in a GUI based way. Detailed installation instructions can be found here.
6.2 Source version
WebseitenMonitor_Source.zip
This is a zip archive of the source distribution of the Webpage-Monitor application. It includes a NAnt build script, so that you can easily build the application out of its sources. Detailed information about the source distribution can be found here.
6.3 Installer
If you do not trust the Webpage-Monitor installer application, you can see the source code of it and build it by yourself. Therefor download the binary or the source version of it. To build the application you can run the NAnt build script included in the source distribution.
Note: The WebpageMonitorInstaller application is that one automatically run after the self-extraction process or the downloadable binary version of the Webpage-Monitor application. It is responsible for setting up the database and configuring the application. To run this installer explicitly copy "WebpageMonitorInstaller.exe" in the base directory of the extracted Webpage-Monitor application and run the installer application from there.